The MPRE stands for Multistate Professional Responsibility Exam, and law students have to take this exam sometime before taking the state bar exam, and apparently it shows that you understand the legal ethics involved in being a lawyer. Whatever. It makes me feel sort of crazy, and cramming all this information into your head within a few days tends to make you feel a bit loopy, and dare I say it, nutty. Which makes me want to eat nuts.
Yes, I'm strange like that. But peanuts alone don't really work for me, I like them in peanut butter sandwiches and cookies, but that's not sufficent to cure any sort of craving I might have had. Fortunately, I recently came across a recipe for peanut-sesame noodles, which is a nice alternative to the tomato-sauce-and-pasta routine and just about as easy. Well, almost.
For one, you can buy the peanut-sauce-in-a-packet at the grocery store, which I tried, and it was pretty gross. Not very peanutty and the flavor was super bland. I've also found recipes that involved just peanut butter and soy sauce, and that was far too overpowering of a flavor, especially if you're using this as a side dish. So I've added the nice addition of coconut milk, which rounds it out without being too coco-nutty, and adds a nice southeastern asian kick to whatever you're making for dinner.
This dish is pretty easy, great warm or cold and fantastic with just about any type of grilled meat or fish, especially seared ahi tuna.
Sesame Peanut Noodles
(serves about four, easily doubles)
- 1/2 cup of creamy peanut butter (preferably no sugar added, and all-natural)
- 1/3 to 1/2 cup of soy sauce (depending on preference)
- 2 tbs. Asian hot sauce (Sriracha/Rooster sauce works best)
- Freshly ground pepper
- About 1/2 can of canned coconut milk, approximately 8 ounces
- 1 package of asian chow mein noodles (usually egg noodles) or spaghetti
- 2 tbs. toasted sesame seeds
- 4 green onions, sliced
1. Mix the first three ingredients together to mix a sort of peanutty paste in a saucepan, until the hot sauce and soy sauce are well incorporated into the peanut butter.
2. Turn on the stove to medium heat, and slowly mix in the coconut milk little by little until it smooths out into a thick sauce. (You can add more coconut milk if the peanut flavor is still sort of intense). Add pepper to taste, and stir occasionally, lowering the heat to simmer for about five minutes or so.
3. Meanwhile, cook the noodles on the package according to directions. Careful not to overcook! Drain, rinse with cold water and place in a large bowl.
4. Add the peanut sauce, and toss to coat the noodles. Sprinkle with sesame seeds and green onions and serve!
7.30.2006
5.31.2006
I say frittata, you say egg pie, I say whatever, cook it yourself.
I stopped eating meat for Lent this year, which definitely affected what I cooked on an everyday basis and thus the recipes posted here. The only one I did post that had meat was one that I wasn’t craving at the time, otherwise it would have been torture. Well, that time is up, and it’s back to writing about the meaty goodness that I love. Bacon in particular. I don’t eat or cook with it much – I mean, it IS bacon, and therefore not really the best for you – but damn it’s tasty.
Someone once mentioned to me that they hated frittatas, for some lame reason such as “real men don’t eat frittatas.” Well, Lorraine in the movie Swingers also stated “real men don’t eat quiches” but I don’t see that stopping anyone.
Well, whichever way you, uh, swing (pun intended) on that subject, frittatas are great, and it’s that person’s loss for hating them. See if I invite them over for brunch anytime soon. Jerks.
As far as ingredients go, regular bacon works fine here, but the apple-smoked bacon just seems so much more satisfactory. And, as you usually buy bacon pre-sliced, apple-smoked always comes much more thickly sliced, which is what you want here – you also don’t want to skimp on the actual meat, and thinly sliced bacon tends to be a very large percentage of just fat.
I actually made this a few days ago and burned the hell out of the bottom. Still edible, but the very bottom layer was toast. I blame the fact that I was up in Mammoth and the high altitude, combined with a very thin skillet pan and an electric stovetop, led to some cooking issues, but really you should be cooking this puppy on the stovetop only until the bottom sets and then finishing it up in the oven, under a broiler. I’ll include both ways, because I usually can’t find an oven-safe skillet/pan in a rented condo and have to improvise.
On a side note, I am a big fan of mushrooms. My roommate is not. Use if you’re not a big mushroom-hating baby. (I’m afraid of fungi!)
Apple-smoked bacon, (mushroom) and spinach frittata
- ½ lb. apple-smoked bacon, sliced thickly and diced
- 1 onion, diced
- 2 cloves garlic, minced
- 1 cup mushrooms, sliced (optional)
- 3 cups fresh baby spinach leaves, loosely packed
- 8 fresh eggs
- ½ cup cream (or milk)
- ½ cup grated gruyere or parmesan cheese
- 3 tbs. parsley, finely chopped
- ½ tbs. butter
- salt, pepper, red pepper flakes
(If you’re using a heavy, oven-proof pan, preheat oven by turning on broiler.)
1. Heat a heavy, preferably oven-proof pan at least two inches deep over high heat, and add the bacon. Cook, stirring occasionally, until fat has rendered and bacon starts to crisp (but not entirely). Remove bacon with a slotted spoon and reserve bacon fat in a separate bowl. (By separating, the tiny bacon crumbs and any gristle will sink to the bottom, allowing for the clear rendered fat to be easily skimmed off the top.)
2. Wipe the pan clean. Add two tbs. bacon fat back to the pan, and heat over medium heat. Add the diced onion and garlic, and stir occasionally for two or three minutes. Add another tbs. of bacon fat, and add the mushrooms, if using. Cook for an additional five to eight minutes, or until the mushrooms have softened, and the onions have begun to caramelize. Add the spinach and stir well to wilt the spinach, about three minutes. Season lightly with salt and pepper. Lower heat to very low.
3. Meanwhile, beat all the eggs together with the cream, grated cheese and chopped parsley. Add salt, pepper, and red pepper flakes to season. Beat until frothy.
4. Add the butter to the pan, making sure to pay attention to the edges of the spinach mixture. Turn up the heat to medium high. Mound the spinach mixture to the center of the pan (see picture: note – for that frittata, I used shrimp. So don’t be alarmed. Okay? Okay.) and pour the egg mixture into the middle of the mound, until all the egg has been poured in and the spinach mixture distributes evenly. (Which, it will.)
5. Cook, covered, until the bottom sets – about five to six minutes. Once this happens, and you’re using a heavy pan, transfer to the oven, and turn up to broil. Broil until the top sets, another four or five minutes. If you’re NOT using an oven-proof pan, which is me most of the time, then just lower the heat and cook covered for another eight or so minutes until the top sets. You should be okay if you’re not in Mammoth. ***
6. Once the top is set, run a spatula around the sides, and gently underneath till the whole thing is loose out of the pan. Slide onto a plate, cut into wedges and serve.
*** Okay, so for a fail-safe way of making sure both sides are cooked and not burnt without broiling – run a spatula around the sides and the bottom once the bottom has set. Slide out of the pan onto a plate. Cover with another plate, and invert. Then, slide it back onto the hot pan uncooked side down until set. Sort of messy but it works, but is hard to pull off.
Someone once mentioned to me that they hated frittatas, for some lame reason such as “real men don’t eat frittatas.” Well, Lorraine in the movie Swingers also stated “real men don’t eat quiches” but I don’t see that stopping anyone.
Well, whichever way you, uh, swing (pun intended) on that subject, frittatas are great, and it’s that person’s loss for hating them. See if I invite them over for brunch anytime soon. Jerks.
As far as ingredients go, regular bacon works fine here, but the apple-smoked bacon just seems so much more satisfactory. And, as you usually buy bacon pre-sliced, apple-smoked always comes much more thickly sliced, which is what you want here – you also don’t want to skimp on the actual meat, and thinly sliced bacon tends to be a very large percentage of just fat.
I actually made this a few days ago and burned the hell out of the bottom. Still edible, but the very bottom layer was toast. I blame the fact that I was up in Mammoth and the high altitude, combined with a very thin skillet pan and an electric stovetop, led to some cooking issues, but really you should be cooking this puppy on the stovetop only until the bottom sets and then finishing it up in the oven, under a broiler. I’ll include both ways, because I usually can’t find an oven-safe skillet/pan in a rented condo and have to improvise.
On a side note, I am a big fan of mushrooms. My roommate is not. Use if you’re not a big mushroom-hating baby. (I’m afraid of fungi!)
Apple-smoked bacon, (mushroom) and spinach frittata
- ½ lb. apple-smoked bacon, sliced thickly and diced
- 1 onion, diced
- 2 cloves garlic, minced
- 1 cup mushrooms, sliced (optional)
- 3 cups fresh baby spinach leaves, loosely packed
- 8 fresh eggs
- ½ cup cream (or milk)
- ½ cup grated gruyere or parmesan cheese
- 3 tbs. parsley, finely chopped
- ½ tbs. butter
- salt, pepper, red pepper flakes
(If you’re using a heavy, oven-proof pan, preheat oven by turning on broiler.)
1. Heat a heavy, preferably oven-proof pan at least two inches deep over high heat, and add the bacon. Cook, stirring occasionally, until fat has rendered and bacon starts to crisp (but not entirely). Remove bacon with a slotted spoon and reserve bacon fat in a separate bowl. (By separating, the tiny bacon crumbs and any gristle will sink to the bottom, allowing for the clear rendered fat to be easily skimmed off the top.)
2. Wipe the pan clean. Add two tbs. bacon fat back to the pan, and heat over medium heat. Add the diced onion and garlic, and stir occasionally for two or three minutes. Add another tbs. of bacon fat, and add the mushrooms, if using. Cook for an additional five to eight minutes, or until the mushrooms have softened, and the onions have begun to caramelize. Add the spinach and stir well to wilt the spinach, about three minutes. Season lightly with salt and pepper. Lower heat to very low.
3. Meanwhile, beat all the eggs together with the cream, grated cheese and chopped parsley. Add salt, pepper, and red pepper flakes to season. Beat until frothy.
4. Add the butter to the pan, making sure to pay attention to the edges of the spinach mixture. Turn up the heat to medium high. Mound the spinach mixture to the center of the pan (see picture: note – for that frittata, I used shrimp. So don’t be alarmed. Okay? Okay.) and pour the egg mixture into the middle of the mound, until all the egg has been poured in and the spinach mixture distributes evenly. (Which, it will.)

5. Cook, covered, until the bottom sets – about five to six minutes. Once this happens, and you’re using a heavy pan, transfer to the oven, and turn up to broil. Broil until the top sets, another four or five minutes. If you’re NOT using an oven-proof pan, which is me most of the time, then just lower the heat and cook covered for another eight or so minutes until the top sets. You should be okay if you’re not in Mammoth. ***
6. Once the top is set, run a spatula around the sides, and gently underneath till the whole thing is loose out of the pan. Slide onto a plate, cut into wedges and serve.
*** Okay, so for a fail-safe way of making sure both sides are cooked and not burnt without broiling – run a spatula around the sides and the bottom once the bottom has set. Slide out of the pan onto a plate. Cover with another plate, and invert. Then, slide it back onto the hot pan uncooked side down until set. Sort of messy but it works, but is hard to pull off.
4.20.2006
mmmm...

Damn this law school thing...I just want to cook. Some of my favorite sources include the Los Angeles Times and 101 Cookbooks. Just check out this photo from a halibut chowder recipe...doesn't it look great? (Taken from LAT.)
If anyone has any recipes they want me to try out, send 'em my way.
shrimpin' ain't easy...well, maybe it is
The following is a recipe for rock shrimp wonton nachos, inspired by the same at Opah Restaurant in Aliso Viejo. Really easy and super tasty – however, it fails to qualify for quick due to the frying that’s necessary for the wonton chips. I guess you could use regular tortilla chips but then it wouldn’t be as tasty. Well, in my opinion anyway.
If you can find it, rock shrimp works best, because the texture is a little firmer, meatier and sweeter than regular shrimp. (Just ask Zack, he knows. Well, he knows the theory, anyway.) I used to be able to find it in the frozen section at Trader Joe’s, but they’ve discontinued selling the line. Damn, they were tasty, too. Regular medium shrimp works fine, as well.
Rock Shrimp Wonton Nachos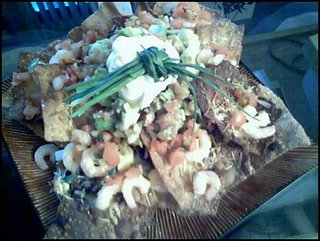
- 2 cups canola oil
- 1 package (50 sheets) of wonton wrappers - sea salt - 1 tbs. olive oil
- 1 clove garlic, mined
- 1 lb. rock shrimp, cleaned and shelled
- Salt and pepper
- 1 can black beans, drained
- 1 can corn kernels, drained
- 2 cups shredded cheddar
- 16 oz. fresh salsa (pico de gallo works best)
- 2 avocados, pitted and diced
- 6 oz. sour cream
- 4 tbs. chives, chopped
1. Preheat oven to 400 degrees. Heat the canola oil in a heavy saucepan over high heat until near smoking, and drop in a wonton skin. It should bubble up and fry quickly, about 2 or three seconds on each side, until a very light golden brown. Fish out with tongs and drain on a plate lined with brown paper bags, and sprinkle a little sea salt over the chip. Repeat until all wrappers have been fried.
2. In a small pan, heat the olive oil and garlic over medium heat for about two minutes, until garlic turns golden brown (but not crispy). Turn up heat to high and add the shrimp, stirring quickly, about a minute, until shrimp is only mostly cooked, as they’ll continue cooking in the oven later. Season to taste with salt and pepper. You’re aiming for a slight crust on the outside without overcooking them in the middle. Remove from pan and set aside.
3. Arrange 1/2 of the wonton chips on an oven safe, decorative platter. Spoon half of the beans, corn, shrimp and cheddar over. Repeat with the remaining chips, beans, corn, shrimp and cheddar, and set in the oven for about ten minutes, or until the cheese is melted.
4. Meanwhile, mix 1/3 of the salsa and avocado together, mashing the avocado slightly to form a guacamole. When cheese is melted on the chips, take out of oven and mound guacamole, salsa and sour cream on top. Sprinkle chives over and serve.
If you can find it, rock shrimp works best, because the texture is a little firmer, meatier and sweeter than regular shrimp. (Just ask Zack, he knows. Well, he knows the theory, anyway.) I used to be able to find it in the frozen section at Trader Joe’s, but they’ve discontinued selling the line. Damn, they were tasty, too. Regular medium shrimp works fine, as well.
Rock Shrimp Wonton Nachos

- 2 cups canola oil
- 1 package (50 sheets) of wonton wrappers - sea salt - 1 tbs. olive oil
- 1 clove garlic, mined
- 1 lb. rock shrimp, cleaned and shelled
- Salt and pepper
- 1 can black beans, drained
- 1 can corn kernels, drained
- 2 cups shredded cheddar
- 16 oz. fresh salsa (pico de gallo works best)
- 2 avocados, pitted and diced
- 6 oz. sour cream
- 4 tbs. chives, chopped
1. Preheat oven to 400 degrees. Heat the canola oil in a heavy saucepan over high heat until near smoking, and drop in a wonton skin. It should bubble up and fry quickly, about 2 or three seconds on each side, until a very light golden brown. Fish out with tongs and drain on a plate lined with brown paper bags, and sprinkle a little sea salt over the chip. Repeat until all wrappers have been fried.
2. In a small pan, heat the olive oil and garlic over medium heat for about two minutes, until garlic turns golden brown (but not crispy). Turn up heat to high and add the shrimp, stirring quickly, about a minute, until shrimp is only mostly cooked, as they’ll continue cooking in the oven later. Season to taste with salt and pepper. You’re aiming for a slight crust on the outside without overcooking them in the middle. Remove from pan and set aside.
3. Arrange 1/2 of the wonton chips on an oven safe, decorative platter. Spoon half of the beans, corn, shrimp and cheddar over. Repeat with the remaining chips, beans, corn, shrimp and cheddar, and set in the oven for about ten minutes, or until the cheese is melted.
4. Meanwhile, mix 1/3 of the salsa and avocado together, mashing the avocado slightly to form a guacamole. When cheese is melted on the chips, take out of oven and mound guacamole, salsa and sour cream on top. Sprinkle chives over and serve.
4.19.2006
sigh...stupid SBC
I have a bunch of new posts, but can't get them up cause they're on my computer and I haven't been able to get my laptop to any Internet in a few days, due to my school being complete assholes when it comes to Macs and SBC being complete assholes in general. Sorry. Will have to just manually transfer one of these days.
4.18.2006
4.12.2006
grey's insomnia
Why I am still up and reading recaps for Grey's Anatomy (on Television Without Pity, the best recap website ever)...I don't know.
Working on a few new posts. Recently made Shrimp Wonton Nachos, inspired by the Rock Shrimp Wonton Nachos from Opah Restaurant, so I'll be writing that up, as well as Fried Ice Cream. Going to make sure I have the steps down tomorrow. Nothing like making something bad for you...ridiculously bad for you.
Working on a few new posts. Recently made Shrimp Wonton Nachos, inspired by the Rock Shrimp Wonton Nachos from Opah Restaurant, so I'll be writing that up, as well as Fried Ice Cream. Going to make sure I have the steps down tomorrow. Nothing like making something bad for you...ridiculously bad for you.
4.05.2006
spring forward
[Ed. note: This is a definite stretch of law-related topics to recipe, but no matter. It’s related in my mind.]
Today’s international copyright class was about venue – the ol’ forum non conveniens and balancing test, blah blah blah. The case involved the copyrights of a Russian composer (actually, his assignee of the rights) and the use of the musical composition – Stravinsky’s The Rites of Spring – in Disney’s animated movie Fantasia. Disney was asserting that their use of The Rites of Spring – which is in the public domain in the US but not necessarily so in other countries – as distributed on videocassette was not an infringement, Stravinsky’s assignees thought it was, and the whole thing was being subjected to a forum non conveniens motion. The Rites of Spring has never been more hotly contested.
Speaking of spring (big stretch here), it’s supposedly so outside. Maybe, but it’s been raining a ridiculous amount out here in Los Angeles lately, which I think is a little uncharacteristic for the area, but it makes me happy – I love the rain and that means awesome snow up in the mountains (if I ever get off my lazy ass and go snowboarding). Anyway, spring makes me think of fresh green foods – such as mint, peas, fennel, late pears and herbs. This “salad” just tastes like spring, and is really good with saucy foods like pork ribs drenched in a spicy glaze (which I’ll put in a later post). Would probably be great with lamb, because of the mint. I forget where this recipe is from, probably a mixture of a couple of sources.
Mint can be really terrible at (most) major grocery stores. The worst bunch was definitely from Ralphs, which normally isn't too bad. Oddly enough, I always get the best and most flavorful mint from 99 Ranch, the Asian supermarket chain, but I’d probably find really great mint at the farmers markets as well. If only I had the time. You're looking for extremely fragrant mint - the kind that turns your head as you pass by the aisle and makes you buy five bunches, despite the fact that you don't normally cook with mint (a la my roommate - we once made mint juleps and mojitos for a week). Try a leaf, it should be a fresh burst of flavor, and not at all bitter.
Snow peas can be substituted with sugar snap peas, whatever’s available.
Snow pea rice salad
- 2 cups uncooked long-grain white rice
- 3 ½ cups water (more or less)
- 2 cups snow peas, trimmed
- 2 cloves minced garlic
- ½ cup fresh lime juice
- 1 tbs. sugar
- ½ cup extra-virgin olive oil
- salt, pepper to taste
- dash of sesame oil (optional)
- ¼ cup ginger, cut into matchstick strips
- ¼ cup of packed mint leaves, sliced
- ¼ cup of green onions, sliced (about 1 bunch)
1. Rise the rice under cool water, until water runs clear. Combine rice and the water, cook until rice is tender (approx. 15 or so minutes over low heat after bringing the mixture to a boil). Scoop out cooked rice into a large bowl and allow to cool completely.
2. Boil a few cups of water in a small pot, with a dash of salt. Add peas and blanch for about 15-20 seconds, then immediately drain and plunge peas into a bowl of ice water to stop the cooking and keep the peas a bright green. Drain.
3. In a small bowl, mix the garlic, lime juice, sugar, olive oil, and salt and pepper to taste. You can add the sesame oil here if desired.
4. Toss together the cooked rice, peas, ginger, mint leaves, and green onions. Add the dressing – you may need less than is prepared, but it makes a nice lime vinaigrette for later use. Toss well, and adjust seasonings if necessary.
Today’s international copyright class was about venue – the ol’ forum non conveniens and balancing test, blah blah blah. The case involved the copyrights of a Russian composer (actually, his assignee of the rights) and the use of the musical composition – Stravinsky’s The Rites of Spring – in Disney’s animated movie Fantasia. Disney was asserting that their use of The Rites of Spring – which is in the public domain in the US but not necessarily so in other countries – as distributed on videocassette was not an infringement, Stravinsky’s assignees thought it was, and the whole thing was being subjected to a forum non conveniens motion. The Rites of Spring has never been more hotly contested.
Speaking of spring (big stretch here), it’s supposedly so outside. Maybe, but it’s been raining a ridiculous amount out here in Los Angeles lately, which I think is a little uncharacteristic for the area, but it makes me happy – I love the rain and that means awesome snow up in the mountains (if I ever get off my lazy ass and go snowboarding). Anyway, spring makes me think of fresh green foods – such as mint, peas, fennel, late pears and herbs. This “salad” just tastes like spring, and is really good with saucy foods like pork ribs drenched in a spicy glaze (which I’ll put in a later post). Would probably be great with lamb, because of the mint. I forget where this recipe is from, probably a mixture of a couple of sources.
Mint can be really terrible at (most) major grocery stores. The worst bunch was definitely from Ralphs, which normally isn't too bad. Oddly enough, I always get the best and most flavorful mint from 99 Ranch, the Asian supermarket chain, but I’d probably find really great mint at the farmers markets as well. If only I had the time. You're looking for extremely fragrant mint - the kind that turns your head as you pass by the aisle and makes you buy five bunches, despite the fact that you don't normally cook with mint (a la my roommate - we once made mint juleps and mojitos for a week). Try a leaf, it should be a fresh burst of flavor, and not at all bitter.
Snow peas can be substituted with sugar snap peas, whatever’s available.
Snow pea rice salad

- 2 cups uncooked long-grain white rice
- 3 ½ cups water (more or less)
- 2 cups snow peas, trimmed
- 2 cloves minced garlic
- ½ cup fresh lime juice
- 1 tbs. sugar
- ½ cup extra-virgin olive oil
- salt, pepper to taste
- dash of sesame oil (optional)
- ¼ cup ginger, cut into matchstick strips
- ¼ cup of packed mint leaves, sliced
- ¼ cup of green onions, sliced (about 1 bunch)
1. Rise the rice under cool water, until water runs clear. Combine rice and the water, cook until rice is tender (approx. 15 or so minutes over low heat after bringing the mixture to a boil). Scoop out cooked rice into a large bowl and allow to cool completely.
2. Boil a few cups of water in a small pot, with a dash of salt. Add peas and blanch for about 15-20 seconds, then immediately drain and plunge peas into a bowl of ice water to stop the cooking and keep the peas a bright green. Drain.
3. In a small bowl, mix the garlic, lime juice, sugar, olive oil, and salt and pepper to taste. You can add the sesame oil here if desired.
4. Toss together the cooked rice, peas, ginger, mint leaves, and green onions. Add the dressing – you may need less than is prepared, but it makes a nice lime vinaigrette for later use. Toss well, and adjust seasonings if necessary.
apple shortcuts - and not the F9 key
A few days after my last post, and completely unintentionally, I made an apple galette, or as Zack calls it, “Cheater’s Apple Pie.” The original recipe is from Bon Appetit magazine, but I changed and added a few things to it. Yeah, apples (and Apple) are good. Just because my law school wants us to “get used to” PCs doesn’t mean they can’t support them – it’s discriminatory to my choice of computer hardware. Would that be okay if they decided to just pick Dells? No. Jerks.
Anyway, I pretty much hate baking, mostly because most of the time I hate measuring things exactly right – lots of my cooking, despite the fact that the below recipes are all exact measurements, is approximate. (I realize my tort(e) post involved baking but that’s cheating too, as I used prepared puff pastry.) Baking (from scratch) needs to be pretty exact, otherwise things won’t rise, or bake evenly, or taste right. My mom is a really amazing baker, and besides being a talented baker she’s extremely exact about everything. I’m just too lazy to be bothered.
However, this recipe was great because the filling is sort of an approximation, and not perfectly exact. Okay, so the crust and the caramel needs to be relatively dead on but I’m happy to compromise. And, there's no rising or resting or any of that crap here. You don’t need the fancy baking tins or molds, or even a pie pan – just a baking sheet. Works for the lazy pie-eater in me.
Cheater’s Apple Pie
For the crust:
- 1 ½ cup flour
- 1 tsp. salt
- 1 tsp. grated lemon zest
- ½ cup (1 stick) chilled unsalted butter
- 3 tbs. ice water
1. Place the flour, salt, and lemon zest in a food processor and pulse until mixed.
2. Add the butter, 1 tbs. at a time, and pulse with flour until a coarse meal forms. Careful not to over-mix as you could melt the butter.
3. Add the water a little at a time until moist clumps form. (If the dough is too dry, add more water as needed.)
4. Take dough out of food processor, form into a disk-esque shape, wrap with plastic and chill for at least an hour, and up to one day.
For the filling:
- 3 tbs. unsalted butter, divided
- 4 Granny Smith apples, peeled, cored and sliced into wedges
- 1 tbs. honey
- 4 tbs. sugar, divided
- 2 tsp. cinnamon
- 1/3 cup dried cherries or dried cranberries
1. Melt butter over medium-high eat in a pan. Add apples, honey and sprinkle 2 tbs. of sugar over, and lower heat to medium. Sauté until apples are tender and slightly browned – about 20 minutes.
2. Remove mixture from heat. Add cinnamon and dried fruit and let cool.
Assembly:
1. Preheat oven to 375 degrees.
2. Cut parchment paper to fit a baking sheet. Unwrap dough and roll out into an approximately (yea!) 12 inch round, using flour so it doesn’t stick everywhere. Mound the filling in the middle, and you can either create a “pie” shape by making a free-form crust around the sides and arranging the apples into pretty shapes, or be even lazier and wrap the dough around the filling making a little purse. If doing the purse method, crimp the middles and seal completely.
3. Brush the remaining butter on the crust and sprinkle with the remaining sugar. Bake for approximately 40 minutes, or until the thing turns golden brown. Slice and serve warm with vanilla ice cream and with a ladle of the caramel sauce (recipe below).
For the caramel:
- 1 ½ cup sugar
- ½ water
- 3 tbs. unsalted butter
- ½ cup heavy whipping cream
1. While the pie is baking, boil the sugar and water together at a high heat for about 20 minutes, brushing the sides of the pan with a wet pastry brush to remove any sugar crystals, until the sugar turns a light golden brown.
2. Turn off heat and add the butter, whisking quickly. Add in the heavy whipping cream, and whisky until incorporated – place back on a low heat, stirring until sauce is thick and creamy. Serve warm with the pie.
(This will keep, refrigerated, for a day or two. Just re-warm when serving.)
Subscribe to:
Posts (Atom)